Mini Baked Chocolate Cheesecakes

Well, Happy New Year! I hope you’ve all had yourself a nice indulgent, and refreshing break. I admit I had intended to blog about this a little sooner but, you know…holidays happened. Hasn’t that sun been great?! Well, recently anyway 🙂

I found this recipe, by Donna Hay, in the New Zealand Herald last year.  Despite regularly browsing the lifestyle (namely food) pages of our online newspapers, I was instantly drawn to the rest of her equally indulgent and mouth-watering recipes. You can check them out here

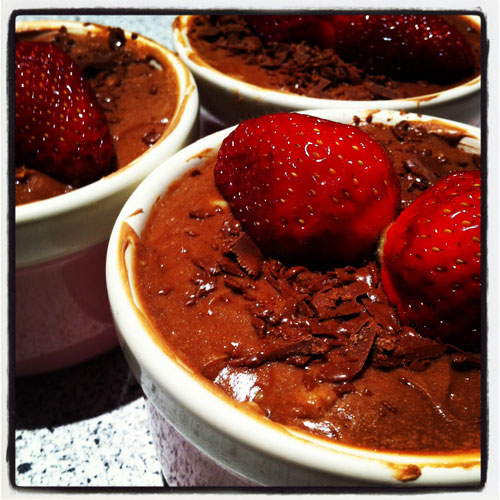
The dessert itself is not heavy at all, and melted in my mouth with a slight moussy texture. I found the sliced fruit (berries, mainly) helped complete the richness and also made it perfect for someone who doesn’t have quite a sweet tooth.

I enjoyed the smaller individual-sized portions which are great if you are making them for a small group of people. There wasn’t any leftovers laying around in the fridge to taunt me in the days following!

So, welcome back to After Taste for 2013 – you can expect all sorts of exciting and tasty recipes to surface in the coming months and in the year ahead.

See you all again soon!

Mini Baked Chocolate Cheesecakes
Serves 4
photo

  • 100 grams chocolate biscuits
  • 30 grams butter, melted
  • 2 tbsp ground almonds
  • 400 grams cream cheese
  • 1/2 cup caster sugar
  • 2 eggs
  • 150 grams milk chocolate, melted
  • Small amount of extra chocolate, for flaking on top
  • Berries, to serve

Preheat oven to 150 degrees. Place the biscuits, butter and ground almonds in the bowl of a small food processor and process until roughly chopped. Spoon the mixture into the base of 4 x 1 cup-capacity ovenproof dishes and press down using the back of a spoon.

Place the cream cheese and sugar in the bowl of an electric mixer and beat until light and creamy. Add the eggs, one at a time, and beat until smooth and thick. Fold through the chocolate and spoon over the biscuit bases.

Place the dishes on a baking tray and bake for 20-25 minutes or until firm to touch. Allow to cool completely at room temperature before placing in the fridge for 2 hours.

Dust with roughly chopped chocolate flakes and top with berries of your choice. Enjoy.

photo

This recipe is my entry in Sweet New Zealand for February 2013! Check out all the great recipes at Greedybread at the end of the month!

sweetnz


Rhubarb and Apple Crumble

Fruit crumble is such a comfort food and what a fantastic dessert to eat on a cold, Wellington night. To be honest I didn’t think I’d be reaching for those ‘cold night’ recipes this early in the year, let alone March! Crikey. Although I’m not too fond of the on-going southelies it definitely gives me an excuse to eat things liiiiike….crumble!

Last year was the first time Wellington got snow in 30 years! Lets hope 2012 isn’t a repeat. Enjoy this toasty treat with some vanilla ice cream and some delicious custard.

Rhubarb and Apple Crumble

  • 3 cooking apples, peeled, quartered and cored
  • 1/2 cup water
  • 10 sticks rhubarb
  • ½ cup sugar
  • 1 teaspoon finely grated orange rind
  • 100g butter, chopped
  • ½ cup self raising flour
  • ½ cup lightly packed brown sugar
  • ÂĽ cup dessicated coconut
  • ½ cup rolled oats

Preheat oven to 180 C. Cut apples into thick slices and place in a saucepan with water. Simmer for 10 minutes. Meanwhile wash rhubarb and chop into 5 cm lengths. Add rhubarb, sugar and orange rind to apple, return to the boil and simmer for 3 minutes. Pour mixture into a shallow oven proof dish.

Make the crumble by rubbing the butter into the flour, mix in brown sugar, coconut and rolled oats. Sprinkle crumble evenly over the apple and rhubarb and bake for 30 minutes.
Serve with icecream, cream or custard.

I’ve chosen to enter this recipe into Sweet New Zealand for March hosted by Emma at My Darling Lemon Thyme! Go and check out some delicious entries.


Mini Lemon Meringue Pies

Lemon Meringue Pie is actually a pretty stunning dessert. Mini lemon meringue pies are even better! I can’t remember ever having had lemon meringue pie because I usually always choose cheesecake over other desserts. There is something about cheesecake, I am never left dissatisfied. Amen.

I borrowed this recipe from New Zealand Woman’s Weekly and it was relatively easy to follow. Last Sunday night I was feeling a little bit creative and decided to make mini lemon meringue pies. I was really reeeeeally happy with the way these turned out – the serving size was just perfect and paired with a spoonful of natural yoghurt or a scoop of vanilla ice cream….you have yourself a dessert made in heaven!

The lemon filling is very similar to lemon curd so you could just as easily pre-make lemon curd and use when needed. Time saving tips for busy December

Have fun with these little bundles of lemony sweet joy!

Mini Lemon Meringue Pies

  • 300g sweet short pastry
  • 4 eggs, separated
  • 1 cup water
  • Finely grated zest and juice of 3 lemons
  • 1 cup sugar
  • 15g butter
  • 1/4 cup cornflour
  • 1/2 cup caster sugar
  • Icing sugar, to dust

Roll out pastry to 3mm thick and use to line a 12-hole muffin pan. Prick the base of each pastry shell with a fork and then chill for at least 30 minutes.

Heat the oven to 200°C. Line each pastry case with baking paper or foil and fill with baking beans (or rice like me!) to blind bake for 15 minutes, then remove paper and beans/rice and return pastry cases to the oven for a further five minutes to dry out. Remove to cool.

Place the egg yolks, water, lemon juice and zest, sugar, butter and cornflour into a saucepan. Cook over a gentle heat for 5 to 10 minutes, stirring continuously until mixture thickens like custard. Remove to cool.

Spread lemon custard mixture into cooked pastry case. Place egg whites in a bowl and with an electric mixer, beat until stiff. Slowly add caster sugar a little at a time, beating well until thick meringue is formed.

Spread meringue over custard to cover completely. Bake at 200°C for 10 to 15 minutes, just until tips of meringue are lightly browned. Dust with icing sugar and slice to serve.