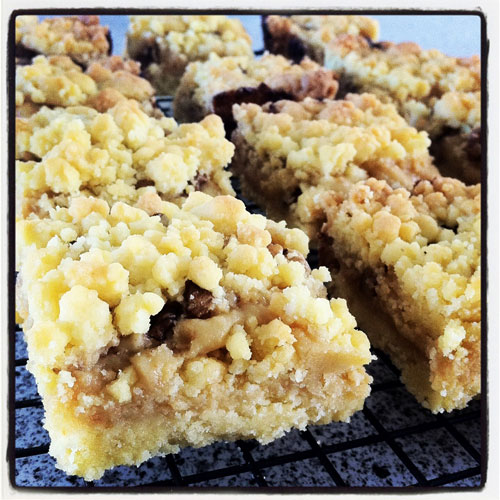
Gooey Salted Caramel Slice

I first tried salted caramel in the form of fudge at a popular London market last year. Best. Decision. Ever. It was absolutely mind-blowingly delicious! I’m pretty sure I ate my fair share of fudge that day. I definitely remember the sore tummy afterwards.

Recently I found this slice recipe in the Bite section of The Herald newspaper a couple of weeks back and I thought, why not! It was really just too good not to share with you lovely folk!

After I got this fix, I was on the hunt for more salted caramel and came across a recipe for  ice cream so watch this space!

Enjoy. Have a great weekend everybody!

photo

Gooey Salted Caramel Slice

  • 250 grams butter, softened
  • 100 grams sugar
  • 100 grams cornflour
  • 50 grams icing sugar
  • 350 grams flour
  • 50 grams walnuts, chopped

Caramel

  • 1 can sweetened condensed milk
  • 2 tablespoons golden syrup
  • 150 grams butter
  • 1 1/4 teaspoons salt

Heat oven to 170 degrees and line a 20 x 30 slice tin with non-stick baking paper.
Cream butter and sugar, add cornflour, icing sugar and flour. Mix together until it forms a ball. Divide the mixture in half, use one half to press it into the tin and place the other half in the fridge.

Bake for 20 minutes until just starting to colour. Remove from the oven and cool.

Make the caramel by melting the butter, golden syrup and condensed milk in a pot until well blended. Make sure you keep stirring to avoid burning. Take off the element and cool – I placed the pot in the fridge for about 20 minutes to speed up the process.

Spread the caramel evenly over the cooled base. Sprinkle over the walnuts. Dice up the remaining dough and sprinkle evenly over the top. Return to the oven and bake for a further 20 minutes.

When cool, slice into squares and store in a biscuit tin. If it lasts that long. Let’s be honest.

13

Lemon Cornflake Slice

Rules to live by #1: You can never ever have too many lemons. Add to that, raspberries, passionfruit and cream chesse. Okay, the rest are entirely optional…

If you’re a reader of my blog, you will know I’m rather passionate about recipes that use lemon juice, rind, or zest.

So, for all you lemon lovers out there, here is yet another recipe for lemon slice I found in the weekend. This one is slightly chewy, fruity and particularly moreish. It slices up really well and is very deserving of a big slab of thick lemony icing! No holding back here 🙂

Happy Friday!

Lemon Cornflake Slice
Makes 32 pieces

Base:

  • 100 g butter
  • 2 tbsp golden syrup
  • ¾ cup sugar
  • ¾ cup coconut
  • 1 cup cornflakes
  • 1 cup rolled oats
  • ¾ cup white plain flour
  • 1 ½ tsp baking powder

Lemon icing:

  • 2 tbsp butter
  • 1 cup icing sugar
  • 3 tbsp lemon zest
  • 2 tbsp lemon juice
Preheat oven to 180°C. In a large saucepan melt butter, golden syrup and sugar together. Add remaining ingredients, and blend well.
Press the mixture into a greased 20cm x 30cm slice pan and bake for 15-20 minutes. Once the slice has cooled to room temperature, ice.
For the icing, beat together butter and icing sugar until smooth. Blend in the lemon juice and lemon zest. Spread over the base.
Slice up when the icing has set and store in an air-tight container.
This is my entry for Sweet New Zealand this month. Head along to The Kitchen Maid and check out all the super tasty entries on offer! Click here to enter!

Tramper’s Oat Slice

Don’t ask me why this recipe, which I found sandwiched between a few hundred pages of one of my Mum’s recipes books, is called Tramper’s Oat Slice. I suppose it is a bit like a homemade energy bar…maybe that’s why.

From the look of it, it was probably a recipe found in the Dominion Post a couple of years ago, and it has become a favourite in our household.  The blurb before the recipe says that the recipe was developed by Deb Baxter who owned a cafe in Blenheim. It’s a real sort of muesli, health bar and is quite tasty, and nutritious!

The addition of lemon juice and lemon rind really adds to the slice and gives it a great tangy flavour that comes through the oats and seeds. You can add as much dried fruit as you like – things like chopped apricots work well, alongside sultanas. This is the kind of slice that you can mix up, and change depending on what you might have lingering your pantry cupboard. Enjoy!

Tramper’s Oat Slice
Makes 40

  • 125 g butter
  • 1 cup sugar
  • 2 tbsp golden syrup
  • 1 egg, lightly beaten
  • 1 cup flour
  • 1 tsp baking powder
  • 1 cup coconut
  • 1 cup rolled oats
  • 1/2 cup sultanas
  • 1/2 cup apricots, chopped
  • 1/2 cup pumpkin seeds
  • 1/2 cup sunflower seeds
  • 2 tbsp lemon juice
  • 2 tbsp lemon zest, finely grated

Preheat your oven to about 180 degrees. Grease a sponge roll tin with a small amount of spray, and line with baking paper.

Place the butter in a bowl, add sugar, golden syrup. Beat until pale and creamy. Add the egg and beat until well combined.

Add flour, baking powder, coconut, rolled oats, sultanas, apricots, pumpkin seeds, sunflower seeds, lemon juice, and lemon zest. Beat until well combined.

Place in tin, and press down. Bake for 35-40 minutes or until golden brown. Slice up when the slice has cooled down a bit and store in an air tight container.

Lemon Biscuit Slice

Right now, I should be packing for my trip, but I felt like sharing this recipe with you instead.

I know I’ve blogged a lot about slices on After Taste in the past so I really don’t need to go into just how much I appreciate a good piece of old-fashioned slice.

But while slices are simple in theory, countless cafes and bakeries just can’t seem to nail it. The base is often terribly crumbly, or dry and the all-important icing-to-base ratio is often out. So your best bet for a tasty wee morsel is generally one you just make, yourself, at home.

From memory this uncooked lemon biscuit slice is a total crowd pleaser. It is quite moist, with a coconutty base and a soft, sweet lemon icing. It is really simple to make and requires absolutely no baking!

Tell me, what is your favourite slice recipe?

Lemon Biscuit Slice
Makes 24 pieces

Base:

  • 250 grams wine biscuits
  • 1 cup desiccated coconut
  • Finely grated zest of 1-2 lemons
  • 120 grams butter
  • 1/2 cup sweetened condensed milk

Lemon icing:

  • 2 cups icing sugar, sifted
  • 40g butter, melted
  • Juice of 1 lemon

Grease and line a 17 x 27cm slice tin with baking paper, leaving an overhang on all sides. Place biscuits in a food processor and process to form fine crumbs.

Transfer the mixture to a bowl, then combine with coconut and lemon rind. Place butter in a small saucepan over medium heat to melt. Stir in condensed milk. Pour melted mixture over the dry ingredients. Stir to combine well.

Press biscuit mixture into prepared tin. Refrigerate for one hour or until firm. When set, ice with lemon icing. To make lemon icing, place the icing sugar in a bowl. Add melted butter and lemon juice and beat until smooth.

New Zealand Lolly Log Cake

Lolly cake or lolly log (as some might know it) in New Zealand is a national institution. It is such a kiwi favourite.

It is found absolutely everywhere here and I would go as far as saying it even makes the  list of my favourite sweet treats. This is the type of food item you’d probably expect to see in every New Zealand bakery, corner dairy, or even your local service station, nationwide. I almost think it is unique to New Zealand as  I have yet to find any reference to its existence that can’t be traced back to a New Zealander’s blog.

It is an uncooked recipe and uses two main ingredients: biscuits and lollies – what could be better?! The mixture is usually pressed into a log shape and rolled in coconut, and then refrigerated until set and sliced up. Sadly I can’t credit anything more than the back of a packet of Pascall Fruit Puff’s for this delightful recipe. Enjoy!

New Zealand Lolly Log Cake
Makes 15 slices

  • 1 packet malt biscuits, crumbs
  • 1 packet fruit puffs or eskimos
  • 100 grams butter
  • 1/2 can condensed milk
  • Coconut

Warm the butter and the condensed milk in the microwave.  Add the biscuit crumbs and either a packet of eskimos or fruit puffs (cut into pieces).  Stir mixture well.  Form the mixture into a log shape or into small balls.  Roll in Coconut.  Put into the fridge for approximately 4 hours.  Once set, cut the log into slices and serve.

Caramel Oat Cake

I often make this cake (err, slice?) and I have wanted to add it to the blog for a good while. Do you know what the funny thing is? I always forget to take a picture before it disappears fairly quickly. Damn.

Well this time I did, so here it is in all it’s glory. This recipe comes from Jo Seagar’s cookbook called The Cook School Recipes. When I first purchased this book, I had every intention of regularly choosing a new recipe and trying it out. But like all my other cookbooks…it took a place on the shelf and I resorted to my laptop and the power of google! Does anyone else do that? I must make more of an effort to make things from an actual recipe book!

The combination of the caramel, rolled oats and wholemeal flour is just so delicious and tastes remarkably healthy! Even though, let’s face it, it’s totally NOT. But hey! We’re all allowed to indulge once in a while! Happy Thursday. Yay, nearly the weekend! Enjoy.

Caramel Oat Cake

  • 1 1/2 cups wholemeal flour
  • 3/4 cup white flour
  • 2 tsps baking powder
  • 1/2 tsp baking soda
  • 3/4 cup desiccated coconut
  • 3/4 cup rolled oats
  • 1 1/2 cups brown sugar
  • 250 grams butter
  • 2 eggs
  • Vanilla

For the caramel:

  • 400ml sweetened condensed milk
  • 2 tbsps golden syrup
  • 150 grams butter

Make the caramel by combining the butter, condensed milk, golden syrup in a small pot over a medium heat. Mix until well combined and make sure the caramel has thickened slightly and turned a golden brown. I put the pot straight into the fridge so it thickened a bit more. It seemed to hold itself together more in the oven rather than oozing into the base.

Mix all the dry ingredients together in a bowl. In a smaller bowl mix melted butter, eggs and vanilla. Stir into dry ingredients. Press 3/4 of the mixture into a slice pan and pour the caramel on top. Crumble the remaining mixture over the top. Bake at 180 degrees for about 40-45 minutes or until golden.

When the slice has cooled, drizzle with chocolate!

I’ve decided to enter this delicious recipe into Sweet New Zealand for March 2014! Check out all the fantastic recipes over at Bake Club at the end of the month!

8yPS8NO

Rolled Oat and Sultana Square

Well, this *thing* has many names in my family but it sits in Mum’s recipe book under “Crunch”….why? I do not know. For the benefit of the reader I have renamed this *thing* to ‘Rolled Oat and Sultana Square’. This is literally an Anzac Biscuit in a slice. Yum!

This thing has been around. It was the slice that filled our school lunchboxes for many years and the slice that traveled throughout New Zealand as we went to our regular camping spots as kids, baking in the heat of the caravan during summer or taken to the beach only to end up a little bit crunchier… This slice even turned up to our netball and hockey games. A lot of my blog posts stir up memories of years past but if I was to really remember one baked item from my childhood, it would be this one.

This recipe is very tasty, easy to cook and perfect for the school (or errr, work?) lunch box!

Rolled Oat and Sultana Square

  • 2 cups rolled oats
  • 1 cup flour
  • ¾ cup sugar
  • 1 cup coconut
  • ¾  cup raisins
  • 150 g butter
  • 2 tablespoons golden syrup
  • 1 teaspoon baking soda

Put the rolled oats, flour, sugar, coconut, and raisins into a large bowl. Melt the butter and golden syrup together. Add the baking soda and stir.

Pour into the try ingredients and mix until well combined. This will create quite a moist mixture. Press into a sponge roll tin. Bake at 180 degrees for about 25 minutes.

Original Caramel Slice

Nothing beats a good caramel slice! Or so I’m told… As I’ve mentioned in a previous post, there are many establishments in Wellington that really excel in this area. Astoria, Sweet’s Mother’s Kitchen…to name a few.

I’ve blogged a few times before with a couple of variations to the caramel slice:

Caramel Crunchy Slice & Baked Caramel and Chocolate Slice.

Both delicious in their own right but by no means, the original caramel slice. A short but oh so very sweet post to mark the end of January! Enjoy.

Caramel Slice

  • 1/2 cup plain flour
  • 1/2 cup self raising flour
  • 1 cup desiccated coconut
  • 1/2 cup brown sugar
  • 100g butter

For the filling:

  • 30g butter
  • 2 Tbsp golden syrup
  • 400g can sweetened condensed milk

For the icing:

  • 2 cups icing sugar
  • 3 Tbsp cocoa
  • 30g butter

Preheat oven to 180°C. Put aluminium foil in a shallow dish. To make base: Sift flours into a bowl, add coconut. Combine brown sugar and butterin a pan until sugar has dissolved. Add mixture to the flours and stir. Press into tin with back of spoon, bake for 10 mins or until brown.

Combine butter, golden syrup and condensed milk in a saucepan. Stir for 10 mins until mixture boils and browns (watch it doesn’t burn on bottom). Pour over base and bake for 20 minutes. Although the original recipe didn’t say so, once the caramel is out of the oven place it in the fridge for 10-20 minutes. This will make the caramel solidify a little and makes icing it a little easier.

For the icing, combine the icing sugar, cocoa and melted butter in a bowl, stir until well combined. Spread over caramel filling.This slice is ridiculously more-ish so freeze it and take one piece out at a time or take it sttttrrrrraight outta the house! So good!

Louise Cake

I’m a little over slice, to be honest. So this will be the last one I will post about for a while. Plus I’ve decided I am going to be slightly more inventive in 2012! Kitchen-wise anyway. I was gifted by my lovely sister a subscription to the award-winning Cuisine magazine for Christmas so I can’t wait to see what treats turn up in my letterbox each month. I’m certainly looking forward to it and for a whole 12 months….exciting!

Now Louise Cake is something that I wasn’t too familiar with pre-December. I always thought it looked very beautiful in all its meringue-laden glory. And we all know that beautiful looking food often takes time to make said food so beautiful.

Well, I surprised myself. This slice is one of the easiest I’ve ever made and it is pretty darn good! Along with Ginger Slice, Louise Cake is another New Zealand favourite consisting of a thin layer of cake topped with raspberry jam, coconut meringue and then baked in the oven. Who’d say no to that?

It was everything I’d imagined and more..thanks to Mr. Simon Holst for the recipe!

Louise Cake

For the base:
100g softened butter
1/2 cup sugar
2 large egg yolks
1 tsp vanilla essence
1 cup self-raising flour
1 cup standard (plain) flour

For the filling:
1/2 cup good-quality raspberry jam (I used Anathoth Raspberry Jam and highly recommend)

For the topping:
2 large egg whites
1 tsp vanilla essence
1/2 cup sugar
3/4 cup coconut shreds

Heat oven to 160 degrees, with the rack just below the middle of the oven. Line the sides and bottom of a pan about 18x28cm with baking paper, allowing enough extra paper on the sides for lifting the cooked slice out, or spray a 23cm square loose-bottomed pan.

For the base, put the softened butter and sugar in a food processor or large bowl. Separate two eggs, adding the yolks to this mixture (and put the whites in a clean medium-sized bowl to use for the topping). Add the vanilla essence, mix the egg yolks through the softened butter and sugar, then add the two flours and mix again until evenly crumbly. Tip crumbly mixture into prepared pan and press down evenly. Bake for 15 minutes.

For the topping, beat the egg whites and vanilla until frothy, then add the sugar and beat until the tips of peaks turn over when the beater is lifted from them. Then fold half a cup of the coconut evenly through the meringue.

Spread the jam over the warm shortcake. Drop the meringue in spoonfuls on top, then spread evenly with a knife. Sprinkle with the remaining coconut. Bake for about 15 minutes at 160C (150C for fan bake) or until the meringue feels crisp and is evenly and lightly coloured. Cool completely before cutting into pieces.

Ginger Slice

Ginger slice or crunch is such an old-fashioned New Zealand treat. I find it almost comforting. I grew up with it and it always filled an empty tin at home. Ginger slice was one of those things that my mother made a lot of when I was little.

The taste and smell of ginger was never a favourite of mine when I was younger – especially the crystalised kind! I have since dicovered it’s wonder and these days tend to enjoy that extra kick that ginger provides.

Ginger slice can vary considerably – a hard crispy base or a more of a softer, thicker one. I am more familiar with the softer base from Mum’s recipe, although this recipe actually came from Sanitariam. No matter the recipe, ginger slice is always best with lots of thick gooey icing.

I have decided to change this recipe a wee bit and make it that *little* bit healthier and slightly more chewy. Like my Muesli Slice recipe I added a bunch of leftover cereal packets to the base. I love the flavours that come through with the ginger. Apricots, berries…sometimes other.

I made this slice a lot in December as it is perfect for all the end-of-year morning teas and Christmas celebrations that go on at work and elsewhere. If someone in your family loves ginger, they would definitely love this slice. I’ve seen some recipes that include crystalised ginger in either the base or as a decoration on top of the icing – an idea if you want to make the slice a little spicier.

Ginger Slice

For the base:

  • 100 grams margarine
  • 2 tablespoons golden syrup
  • ¾ cup sugar
  • ¾ cup coconut
  • 1 ½ cups crushed Sanitarium Weet-Bix (or any leftover cereal)
  • ¾ cup white plain flour
  • 1 ½ teaspoons baking powder
  • 1 ½ teaspoons powdered ginger

 For the icing:

  • 2 tablespoons margarine
  • 4 teaspoons golden syrup
  • 1 cup icing sugar
  • 1-2 tablespoons ginger
Preheat oven to 180°C. In a large saucepan melt margarine, golden syrup and sugar together. Add remaining ingredients, blending well.
 
Press into a greased 20cm x 30cm slice pan and bake for 15-20 minutes. While hot, mark into squares. Then ice once cool, with hot icing.
 
For the icing, place margarine and golden syrup into saucepan and melt. Blend in icing sugar and ginger, and pour over base, while still warm.
 
Such a simple recipe, but very delicious.