Healthy Pizza with a Cauliflower Crust

A couple of weeks ago I saw a great recipe posted on Twitter. This was a healthy alternative to pizza which used cauliflower as a primary ingredient in the base.

To be quite honest, I was a little unsure about using cauliflower to make an entire pizza crust, but trust me when I say this – it is pretty amazing, and I will definitely be making it again!
111111

This recipe is easy to follow and shows pizza can be healthy, and still deliciously good. The crust already has cheese so you don’t really need much more on top.

Also pays keep in mind that the cauliflower crust isn’t quite as hearty as most regular pizza dough so you don’t want to weigh it down with a lot of ingredients.

Healthy Pizza with a Cauliflower Crust
Serves 8

For the crust:

  • 1/2 head cauliflower (about 2 cups)
  • 1 clove garlic, minced
  • 1/4 cup parmesan (an alternative can be mozzarella)
  • 1 egg, beaten
  • 1 tsp basil
  • 1 tsp oregano
  1. Pre-heat oven to 400° F. Grease and line a baking tray.
  2. Remove the stems and leaves from your cauliflower and chop the florets into chunks. Add to a food processor and pulse just until the texture is similar to rice. If you don’t have a food processor, you can grate the cauliflower with a cheese grater or chop it.
  3. Place cauliflower in an uncovered microwave-safe bowl and cook for 8 minutes. In a bowl combine the cooked cauliflower with all remaining ingredients.
  4. Spread dough out evenly over the baking paper. The pizza should be about 9-10 inches in diameter.
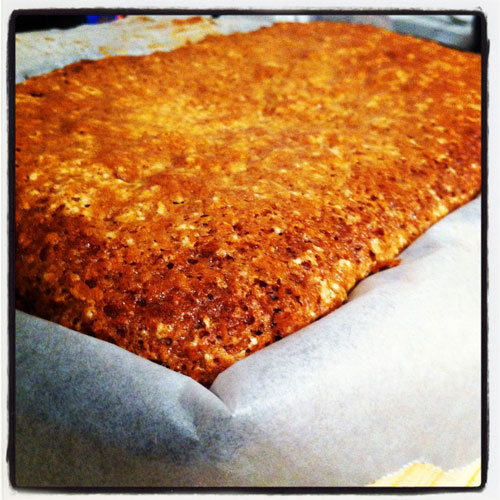
  5. Bake for 25-30 minutes or until the crust is golden, crispy on the edges and cooked through the middle.
  6. Remove the crust from the oven.
  7. Top with pizza sauce and toppings. You can top the pizza with whatever you like desire. Keep is simple. Be careful not to add too many heavy toppings as you don’t want to weigh down the crust.
  8. Bake the pizza for 5 minutes, or until the toppings are hot and the cheese is melted. Allow the pizza to cool for 2-3 minutes then cut and serve immediately.

Tip: I found the pizza only lasted 1-2 days in the fridge, so it is best eaten in one go!


Tramper’s Oat Slice

Don’t ask me why this recipe, which I found sandwiched between a few hundred pages of one of my Mum’s recipes books, is called Tramper’s Oat Slice. I suppose it is a bit like a homemade energy bar…maybe that’s why.

From the look of it, it was probably a recipe found in the Dominion Post a couple of years ago, and it has become a favourite in our household.  The blurb before the recipe says that the recipe was developed by Deb Baxter who owned a cafe in Blenheim. It’s a real sort of muesli, health bar and is quite tasty, and nutritious!

The addition of lemon juice and lemon rind really adds to the slice and gives it a great tangy flavour that comes through the oats and seeds. You can add as much dried fruit as you like – things like chopped apricots work well, alongside sultanas. This is the kind of slice that you can mix up, and change depending on what you might have lingering your pantry cupboard. Enjoy!

Tramper’s Oat Slice
Makes 40

  • 125 g butter
  • 1 cup sugar
  • 2 tbsp golden syrup
  • 1 egg, lightly beaten
  • 1 cup flour
  • 1 tsp baking powder
  • 1 cup coconut
  • 1 cup rolled oats
  • 1/2 cup sultanas
  • 1/2 cup apricots, chopped
  • 1/2 cup pumpkin seeds
  • 1/2 cup sunflower seeds
  • 2 tbsp lemon juice
  • 2 tbsp lemon zest, finely grated

Preheat your oven to about 180 degrees. Grease a sponge roll tin with a small amount of spray, and line with baking paper.

Place the butter in a bowl, add sugar, golden syrup. Beat until pale and creamy. Add the egg and beat until well combined.

Add flour, baking powder, coconut, rolled oats, sultanas, apricots, pumpkin seeds, sunflower seeds, lemon juice, and lemon zest. Beat until well combined.

Place in tin, and press down. Bake for 35-40 minutes or until golden brown. Slice up when the slice has cooled down a bit and store in an air tight container.

Slow Cooker Spicy Carrot and Pumpkin Soup

There’s something comforting about a bowl of hot soup in the middle of Winter. Even more so, knowing it is a bowl of homemade soup.

Last weekend was a typical ‘four seasons in one day’ kind of weekend. New Zealand’s weather can be a little unpredictable sometimes. Saturday was brilliant – sunny, and even pretty warm! For the people that aren’t local, everybody in Wellington has a little smile on their face and a little extra spring in their step when Wellington is given a stunner of a day.  Trust me, we don’t get them often! There’s a saying here: ‘You can’t beat Wellington on a good day!’

But………..Sunday, like after every not-a-cloud-in-the-sky day, we got a little payback. Sunday was rotten, the air was bitterly cold and it actually consistently rained alllllllll day. Not long into the day, I decided it was going to be a soup day! Despite not being able to exit the house in the event I returned a drowned rat, I got the slow cooker out and a whole lot of vegetables and made a delicious, spicy soup. It warms your insides and makes you feel a little bit happier about being tucked up inside while it rains cats and dogs, outside.

Here it is, enjoy.

Slow Cooker Spicy Carrot and Pumpkin Soup
Serves 6

  • 1 large onion, chopped
  • 2 cloves garlic
  • 2 tablespoons oil
  • 2 large carrots, peeled and chopped
  • 2 medium potatoes, scrubbed and chopped
  • 4 cups pumpkin, cut into chunks
  • 3 tablespoons plain flour
  • 1 teaspoon salt
  • 1/2 teaspoon curry powder
  • 1 pinch ground chilli
  • 2 1/2 teaspoons paprika
  • 1/4 teaspoon nutmeg
  • pepper, ground
  • 3 cups vegetable stock
  • 1 cup additional water
  • fresh mint, chopped (optional)

In a large pan heat the oil and add the onion and garlic. Cook until softened. Add the prepared vegetables and the flour and mix as well as you can, allowing the flour to absorb the oil.

Put the whole lot into the slow cooker. Add the spices, salt, pepper, stock and water and cook on high for 4 hours or low for 6 hours. When the vegetables are tender, purée or process the soup until smooth and return to the slow cooker to keep warm.

Adjust the consistency to suit your personal taste and add some chopped mint. Served with a slice of hot toast and butter on a rainy, cold evening! Thanks to Healthy Food Guide for the recipe!

Pumpkin, Spinach & Feta Muffins

These muffins are fantastic!

One, they are pretty versatile and two, they are often the result of the great-big-fridge-clear-out. And to honest, they also make for a damn good, healthy lunch.

Okay, so my latest addiction, the Ministry of Food Cheese Scone gives these muffins a more than decent run for their money in terms of lunch material. But give this recipe a go anyway, you will not be disappointed!

Pumpkin, Spinach & Feta Muffins
Makes 12

  • 2 cups flour
  • 4 tsp baking powder
  • 1/4 tsp salt
  • 50g butter
  • ½ cup milk
  • 1 egg, beaten
  • 2 tbsps sweet chilli sauce
  • 1 packet feta cheese, cubed
  • 2 cups pumpkin, cubed and roasted
  • 1 onion
  • 2 cups spinach

Pre-heat the oven to 180 degrees. It is best to prepare your choice of vegetables before you start, like roasting the pumpkin cubes and chopping the onion and mushrooms – set aside in a bowl.

Mix together flour, baking powder, salt and feta. Add vegetables to dry ingredients. Melt butter and combine with milk, egg and sweet chilli sauce. Add to dry ingredients. Mix to combine, but remember to not over mix. Spoon the mixture into a greased muffin tray.

Bake at 180 degrees for at least 15 minutes. Cool in pan on a rack five minutes, then transfer muffins from pan to rack and cool to warm or room temperature.

Old-Fashioned Sausage Rolls

Sausage rolls – they’re usually a little touch n’ go, aren’t they.

It is fairly rare that I’d go to a cafe to eat a sausage roll these days, but while I’m here I might as well give a little shout out to one of the quaintest little cafes in the Hawkes Bay. That cafe is The Paper Mulberry and you should definitely go there if you are passing through and in need of a cuppa. These guys make great sausage rolls, and fabulous coffee! Either way, you’ll find it well worth slowing down and pulling in.

But if you’re not up that way, check out this recipe.  Although this is only my second ever homemade sausage roll experience, they taste pretty good! Much better than the very first time I attempted a sausage roll which were the days of Home Economics at intermediate school, I was 11. This recipe is based on one I found in The Healthy Food Guide magazine and includes a vegetable or two so probably a bit healthier than your average sausage roll!

They make a great snack, lunch or party food and you can decide how big or small you want them to be. I do have one tip though: make sure you have heaps of tomato sauce or nice chutney to go with them. They really are quite delicious straight out of the oven! Next time though, I think I will experiment with the flavours a bit more. I just discovered a recipe that uses caramelised onions and blue cheese! Amen to that, so watch this space!

Old-Fashioned Sausage Rolls

  • 3 sheets ready-rolled reduced-fat puff pastry
  • 500 grams trim pork mince
  • 2 slices wholemeal bread, made into crumbs
  • 1 medium onion, chopped
  • 1 medium kumara, grated
  • 2 courgette, grated
  • 1 tbsp bran
  • 2 tsp dried sage
  • 2 tsp mixed herbs
  • 1/2 teaspoon salt
  • 1 tsp Worcestershire sauce
  • 2 tablespoons tomato sauce, be generous
  • water, to seal pastry
  • 1/4 cup trim milk, for glazing

Preheat the oven to 220 degrees. In a bowl, combine the fresh breadcrumbs, herbs, salt, bran flakes, onion, meat, grated kumara, grated courgettes and the sauces. If you have a processor, chop the onion, add the slices of bread and pulse to crumbs, then add all the rest of the ingredients and mix in the processor.

Lay out the pastry on a floured bench. Scoop out the meat mixture and place a ‘sausage’ of mixture along the middle of each strip. Brush one edge of the strip with water, roll the pastry over and seal it together to form a long roll.

Cut into approximately eight sausage rolls depending on how big you’d like them. Place the rolls seam side down on a greased tray. Slash the top of each sausage roll once or twice with a serrated knife to allow steam to escape, then brush each one lightly with milk. You could then sprinkle with a few sesame seeds or poppy seeds or perhaps, sprinkle with a small amount of grated cheese. Clearly I forgot this step! 😦

Bake in the preheated oven for 20-25 minutes, or until dark golden. Serve with tomato sauce or a nice chutney for dipping.

Spinach and Feta Tartlets

I actually can’t recall when I first saw this recipe. No doubt in some women’s magazine I picked up briefly at the supermarket or in a waiting room. I truly believe one of the best fillings for pretty much *anything* is the spinach and feta combo. Spanakopita, quiche, tarts, omelettes, bread…you just can’t beat it. In fact, I’m pretty sure any time I cook with either it is always a success.

This recipe is a gorgeous combination of spinach and feta cheese in a nice pie crust. I could seriously eat one of these almost every day, well I wish! The filling is so quick and easy to throw together, too.…what’s not to love?

Go on…enjoy this lunchtime delight.

Spinach and Feta Tartlets
Serves 12 

  • 200 grams baby spinach leaves, chopped
  • 200 grams creamy feta
  • 200 grams puff pastry
  • 2 medium-sized eggs
  • 1 tsp ground nutmeg
  • Salt and pepper
  • 100 grams sun-dried tomatoes, chopped

Turn the oven on to 180 degrees. Spray a 12-hole muffin tin. Roll out pastry into a large rectangle and using a pizza cutter, slice into approximately 8 x 8 cm squares. Next carefully mould each piece into the muffin pan.

Pop the spinach, feta, sun-dried tomatoes, nutmeg and eggs into a bowl and combine. Add salt and pepper to taste. Spoon mixture evenly amongst the pastry cases. Place into the oven to bake for approximately 20-25 minutes.

Put one of these into the lunchbox along with a side salad!

Homemade Hamburgers

Every now and then I go over to the Healthy Food Guide and grab a recipe for dinner. They have hundred of recipes that are healthy, low-cost (using few ingredients) and easy!

As a kiwi, I enjoy an outdoor barbecue every now and then! And like most, I also enjoy creating a homemade hamburger! Seems awfully simple and not entire worthy of a blog post, but helpful none the less.

Homemade Hamburgers
Serves 6

  • 500 grams beef mince
  • 1 carrot, grated
  • 1 onion, finely chopped
  • 1 teaspoon garlic or onion salt (I used regular cooking salt)
  • 1/2 cup rolled oats

Place the beef mince, carrot, onion, salt and rolled oats into a bowl. Mix with clean hands and divide into 6 lots. Press each lot into a saucer to make a patty, or shape patty with your hands. At this stage place all 6 patties on a plate and pre-cook in the microwave for around 5 minutes. This really speeds up the cooking process!

Now if you’ve got yourself a beautiful sunny evening, you can use the BBQ to cook these. I didn’t so I sprayed a frying pan. Put patties in and fry, turning, until cooked. Remember to turn down the heat if you find they are cooking too fast.

Split buns in half. Grill until golden. Spread with tomato sauce. To put hamburgers together, place cooked meat patty on top of sauce, then tomato slices on top, then lettuce and other salad ingredients of your choice! Put lid on top and serve. Yummy.

Warm Roast Pumpkin Salad with Feta

I’m a real salad person. I can order a bowl at a cafe or restaurant and be completely content. It is just so refreshing and tasty. Sometimes there is nothing quite like a roast vege salad. Infact it is one of my favourite things to have as a light, quick meal or a really delicious lunch for work. Salads are so easy to throw together and best of all, there are no rules! Choose whatever you like and throw it together. You’ll have yourself a delicious salad in no time!

I usually use a mix of pumpkin and kumara (sometimes potato) as a base and then the world’s my oyster. Tomato? Cheese? DIY dressing? Sure, why not!

This salad is really tasty so make sure you bookmark it! Roasted veges are so heavenly so feel free to play with this recipe and use whatever veges or ingredients you have on hand!

Warm Roast Pumpkin Salad with Feta
Serves 2

  • 1/2 a pumpkin, chopped into cubes
  • 1 tbsp balsamic vinegar
  • 1 tsp cooking salt
  • 2 cups baby spinach
  • 1 spring onion
  • 40 grams creamy feta
  • 25 grams sun-dried tomatoes
  • 1 tbsp light sour cream
  • 1 tbsp hummus (of your choice)
Mix the chopped pumpkin with a splash of balsamic vinegar and a tsp of salt. Place the mixture on a baking tray lined with baking paper. Bake on 200 degrees for about 20-30 minutes.
Remove the pumpkin and place in a large glass bowl to cool down slightly. Chop up some spinach and place in the bowl. Add spring onion, feta and sun-dried tomatoes.
For a quick dressing, mix together 1 tbsp of hummus (I used a spinach and feta one but anything goes!) with some light sour cream. Add a small splash of balsamic vinegar and mix until combined. Add to the bowl and toss salad until lightly coated in the dressing! This salad is best eaten straight away, or refridgerate immediately for lunch!
Season with salt and pepper to taste. Serve with a warmed slice of ciabatta bread.

Beef and Vegetable Pie

I came across a food magazine the other night at the supermarket that I hadn’t seen before. It is published here in New Zealand and is called Recipes+. The April issue contains at least 300 recipes which are no-fuss and extremely budget friendly.

Every recipe in the magazine is easy, and delicious! I was particularly impressed to see it also had plenty of recipes that were gluten-free and vegetarian. Best of all, it contained an excellent index! There isn’t anything worse than seeing a recipe and having to flick through to find it again a couple of months later!

I have a few meals that I am going to try this week. So if you’re looking for a delicious, filling weeknight meal which is inexpensive and low in fat, look no further.

Beef and Vegetable Pie

  • 500 grams beef mince
  • 1 brown onion, chopped
  • 500 grams vegetables, chopped (I used broccoli, carrots, potato, and zucchini)
  • 1/3 cup brown onion gravy powder
  • 1 sheet frozen puff pastry, thawed

Preheat oven to 200 degrees. Grease a 20 cm square ovenproof dish. Heat oil in in a saucepan over a high heat. Add mince and onion. Cook stirring to break up any lumps in the mince, for 5 minutes or until browned.

Add chopped vegetables, gravy powder and a 1/2 cup of water. Cook and stir for approximately 3 minutes or until the sauce is nice and thick!

Transfer mince mixture to prepared dish. Place a pastry sheet over the mince mixture to cover. Roll the overhanging pastry inwards to form a border around the edge of the dish. Score the top of the pastry with a small sharp knife. Brush with extra milk.

Bake for 12-15 minutes or until browned.

This pie is perfect to eat around this time of the year when the nights are cooler and all you want is a nice, hot meal when you get home. On a sweet note, the April issue also includes a picture of a pretty amazing looking White Chocolate Mud Cake – something else I might have to try! Drool.

Sultana and Bran Loaf

There is not a lot one can say about loaf. Nothing riveting anyhow.

Every now and then I decide to make something to put in my lunch to take to work. Mainly because I often get a case of the 3 o’clock munchies (come on, you all get it too). I like to have something with me so I don’t waste money on something unhealthy or ridiculously overpriced.

Batches of muffins often do the trick but this time I settled on a loaf. I haven’t had a slice of loaf in a while and it is so easy to make, and more importantly only uses one bowl!

I’m really not sure who to credit for this recipe (possibly Alison Holst) as I quickly copied it down from one of Mum’s recipe books. It truly is quite delicious! What’s more you don’t need any eggs or butter, and the loaf is still moist.

Although I only used 1 cup of sultanas, a second cup of chopped dates and other finely chopped dried fruit such as dried apricots would work really well.

Bake this in a loaf tin which holds 5-6 cups.

Sultana and Bran Loaf

  • 2 cups bran
  • 2 cups sultanas
  • 2 cups of sugar
  • 2 cups of trim milk
  • 2 cups self-raising flour (or 2 cups flour & 2 tsp baking powder)
  • 2 tsp ground ginger
  • 2 tsp mixed spice

Preheat the oven to 150 degrees. Spray a loaf tin and line with non-stick baking paper. Mix all the dry ingredients together and scrape into a tin.

Bake for 90 minutes or until a skewer in the centre comes out clean. Cool completely before wrapping in cling film and refrigerating. Leave overnight before cutting with a sharp serrated knife. I find this loaf is best eaten in 8 – 10 days.